Zipline Design -- plan and prepare zipline designs
To begin the zip line design step, determine who it is for, the ages and capabilities of users, and assess the amount of area you have available. If you have trees on the property you may not need a sloping terrain, but slope is definitely helpful. The starting point can be elevated on the first tree to provide the elevation drop. If you have gentle sloping decent across your land your zip line design should incorporate an elevation profile as described below. This will help in many areas of the design.
The Design Process. The design process to build a zip line can be split into two important activities--the "concept development" and the "design". Count on putting roughly twice as much time into the concept and design process as actually assembling the project. So, what's the difference? The concept is "big picture". It is the overall visual picture of the ride, like size, height, speed and basic orientation on the property. Designing involves calculating quantities, sizes, dimensions, calculations and applying the measurements. These values are establish during the concept development phase of the design process. Some people merge the concept and design steps. For small zip line designs this may be intuitive enough, but it's helpful to consider them separately for larger projects. This will allow you to be creative while not getting bogged down in details and may help avoid redoing calculations as the concept evolves.
Zip Line Design Process. The goal of the design process is three-fold:
- take the big picture concept, break it down into components, and apply analytical problem solving to each component
- develop a list of zip line equipment and materials and other tasks that need to be done
- develop a task timeline. The task timeline is a listing of tasks which must be done in sequence order
Zip Line Plan. Fundamentally you are developing a design to fasten a cable to anchors, and stretch it tight, then attach a pulley or Trolley. Test with weights (not people) and make necessary changes based on the test results. Your zipline plan will take shape based on who it is for (kids or adults or both), the available length, and your budget. TThe budget may influence the length and the type of gear you use. There are several zip line kits available with parts ready for assembly. Or, you may choose to purchase parts individually.
Find the Right Location. One option to developing your plan is to layout your site on a map. In this way you can identify several candidate paths quickly, and possibly find openings through the trees and unique places you would not otherwise notice. First plot the trees, large bushes, rocks, utility poles and any other obstructions on a map. Find two anchor points, for example large trees, closer together than the length of your cable is long. These anchor points need to be clear, or can be cleared of obstructions in a line between them and have the desired slope. Identify several candidate anchor locations on your plan.
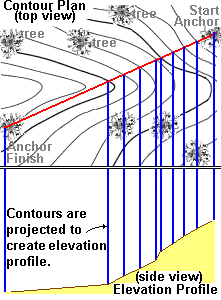 Make a Contour Plan. Sketch out a contour plan. This is a top-down look at the area. You don't need the entire site contour, only the elevation changes in the line between your anchors. At this point you should have several candidate anchors picked out. To sketch the contours, use a carpenter's level. From the first anchor in a straight line toward the ending anchor. Take a few steps, then look back at the starting point. Sight along the edge of the carpenter's level while holding it about five feet above ground. A carpenter's level has a bubble which you use to keep it horizontal. Keep the tool horizontally level as you sight across it. Step away from the anchor until your line of sight across the tool points at the beginning anchor point. Stop when you sight the anchor. If the tool is level and you hold it at about five feet above the ground, then this point marks about five feet of elevation change. Mark the spot on the ground and repeat the process to find the next point. Measure the distance between each point all the way back to the starting anchor. Plot this data on paper to create a customized contour plan. The contour plan graphs the elevation of the terrain along the proposed zip line path.
Create an elevation profile. At the point each contour intersects the zip line course, project a line down the page to create an elevation profile plan. The elevation profile points are taken from each intersecting point of the contour lines and the straight line between the anchors (the proposed zip line direction). If you can obtain an engineer contour map of your area the process is the same, but you can save the step of measuring and then drawing the contour lines. You still need to draw in the trees and obstructions, plot out several candidate locations, and project the contour to create an elevation profile. Use the contour and elevation profiles like this to visualize each plan's profile and slope and consider the merits of each potential course. The contour plan will show you clearly where you may not have enough clearance, or too much elevation drop, or not enough. The weight of the cable needs to be taken into account as well.
The hanging cable. The cable itself hangs in the shape of what is called a "catenary curve". This is the shape of the wire rope hanging under its own weight. An everyday example are the telephone and power cable lines.
The purpose of the interactive demo below is only to get an intuitive feel for how the zip line will hang under its own weight with basic tension and elevation parameters changing. Experiment with the catenary curve interactive demo to see how the cable hangs under its own weight with various end elevations and tension.
Catenary Curve Interactive Example
|
|
|
The Catenary Curve. The catenary curve is not a parabolic curve. Basically it tends to drop sharper from the ends and flattens out near the bottom. The interactive illustration of this type of curve gives you the opportunity to get the feel for how your line will hang under its own weight (without a person or any other weight added), and gives you the choices of applying tension and elevation differences.
Determine the actual curve of the cable. There's nothing like the real thing. Go out to the site with parachute cord or similar weight line, run it from the beginning anchor to ending anchor. A lighter cord or string can be used but parachute cord has good qualities for this purpose. Try different tensions to see how the cord hangs.
A lightweight cord can be made to match the catenary curve of a heavy cable by reducing the tension. Use the cord to help you visualize the slope, clearance and sag before you invest time and money to build a zip line. Using the parachute cord, do several tests using just a carabiner with a small amount of weight attached (five pounds or less). This will show the sag that the line will take on. It will not be exact, but it does provide a visualization for the 3-D path of a rider along the cable. You will observe a large amount of drop at the start, then fairly level traverse from the middle to the end. This is the behavior of the catenary curve combined with the simulated weight of a rider. Experiment with tensions and weight to help anticipate what will happen after you install the actual cable.
Develop a Task Timeline. Develop a timeline of the tasks that need to be done. This is a useful design tool for your zip line project and will save you time overall. A thorough timeline will organize task sequence, help create a list of materials, anticipate the needed tools and track progress. A task timeline is also call a Gantt chart. Several free open source Gantt Chart software programs exist on Amazon. See them here: Gantt Charting Software on Amazon. A Gantt chart works like a spreadsheet with cells and columns, but additionally includes a bar graph displaying time and task sequence.
Design Considerations if Anchoring to a Structure. Attaching the anchor to an existing structure may add an additional requirement for inspection or permitting. You must ensure that any existing structure you are connecting the zip line to is strong enough to support the additional stresses. Since the structure is already there, it was most likely not designed and installed with the intention of supporting the horizontal sheer forces it will receive from a zip line. It may require additional shoring. Make sure to have someone inspect the structure for use with new purpose and do all required reinforcement and shoring, including having an inspection done after the shoring modifications are complete if needed.
Freestanding Zip Line. A freestanding zip line is usually short and low. The freestanding type provides you the most versatility in setting a location. It will be movable if necessary, and reduces the need to modify and attach to an existing structure or tree. This type of zip line plan is good for situations where existing features for anchors do not exist. The support structure must be capable of supporting the forces of the cable tension and the weight of the riders.
Zoning, CC&Rs and Permits. Check your local zoning office and community covenants, conditions and restrictions (CC&Rs) to decide what approvals may be needed. Zoning applies to the type of use. CC&Rs apply to community standards. Permits apply to construction standards and safety. If any approval is needed prepare and present the zip line plans highlighting how you resolve any construction code or safety concerns.
Summary: Designing a Zipline
Consider and develop the general zip line concept before beginning the design calculations. The design calculations are very specific and could bog you down if you don't separate the two. Subdivide complex tasks into several smaller tasks to help manage and think through each problem separately and analytically. Create a list of materials and formulate a task sequence. Group the related tasks, materials and tools together by date. Graph the sequence of events in a Gantt chart or put them on a calendar to help you anticipate the need for tools and materials by that date.